White Water Rafting with Mimi


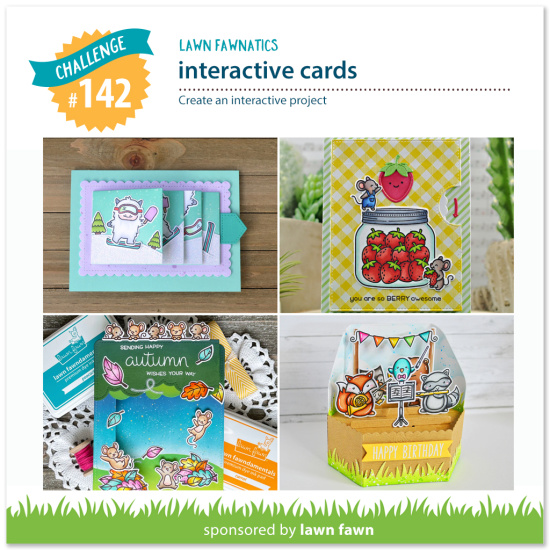
You are invited to share your creativity by linking up your crafty projects at the end of this post! Your project should feature Lawn Fawn stamps, dies, stencils and papers. This challenge will run for 2 weeks and be open until Sunday, August 20 at 11:59PM ET.

For each challenge, we will randomly select an entry to receive a $50.00 gift certificate to the Lawn Fawn shop! Everyone who enters a challenge has a chance to be the random drawing winner! Woohoo!

We will also be highlighting a few of your fabulous projects at the close of each challenge! By linking your projects to our challenges, you will give permission for us to post your work to this blog and our social media sites. Check out the How to Play page for a few guidelines to play along. We want this to be FUN, so we’ll keep the rules to just a few!

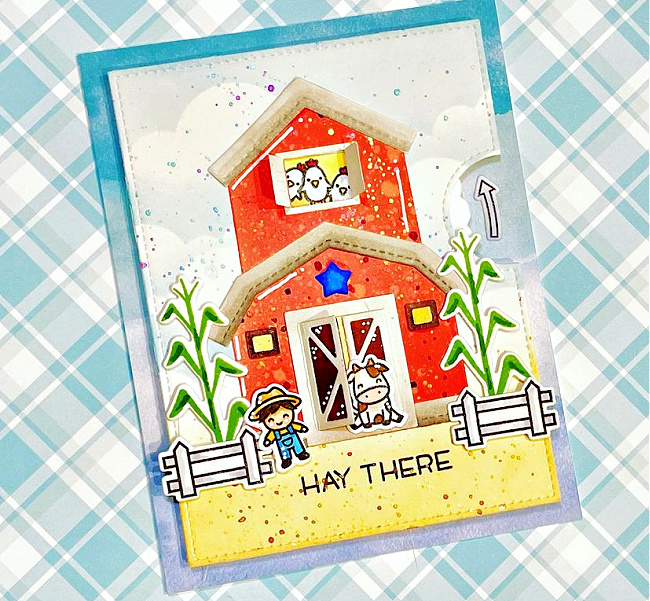
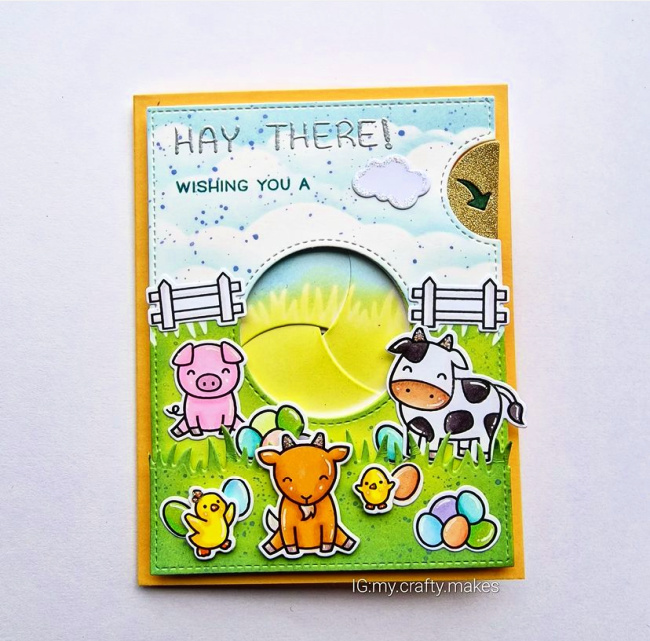
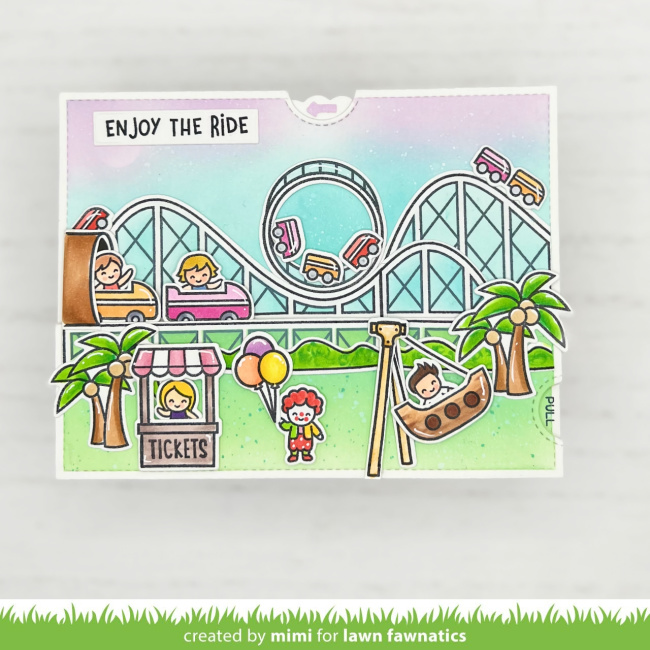
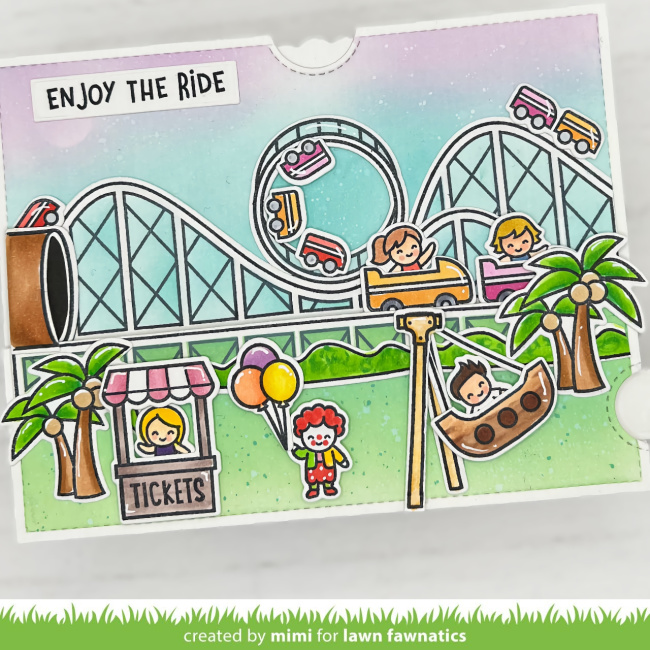
It’s the last weekend for the Into the Woods challenge and Mimi has a super fun idea to inspire you! Her interactive whitewater rafting scene is filled with fun and adventure!


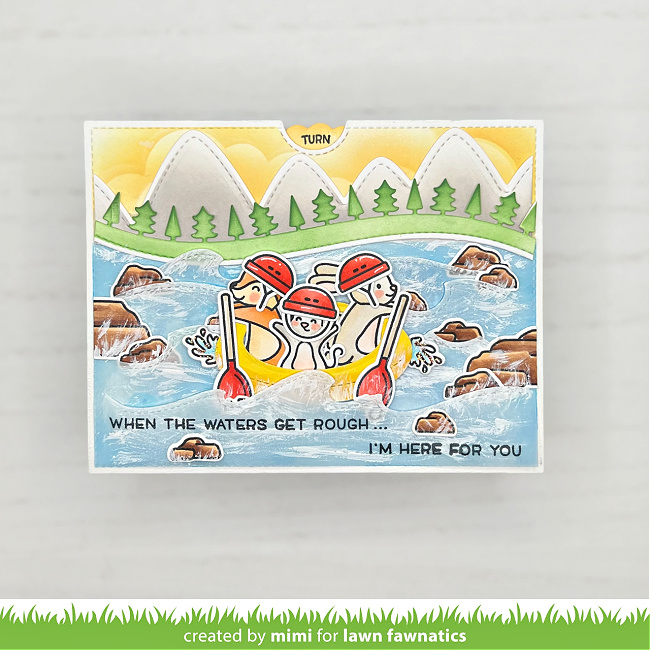
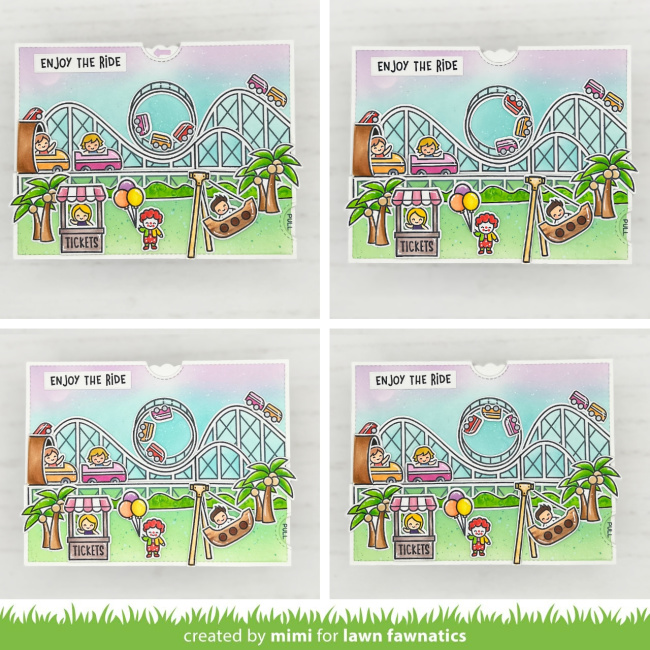
Mimi used the Reveal Wheel to add the fun interactive element to her card! She built her scene with stenciled clouds, Stitched Mountain Borders, Forest Border and Stitched Wave Borders. She used animals from Scootin’ By and You Autumn Know. The helmets are from Scootin’ By, the “paddles” are spoons from Baked with Love and the rocks in the river are from Mermaid for You, Ocean Shell-fie and Christmas Fishes. The raft is made using an altered Flamingo Floatie.


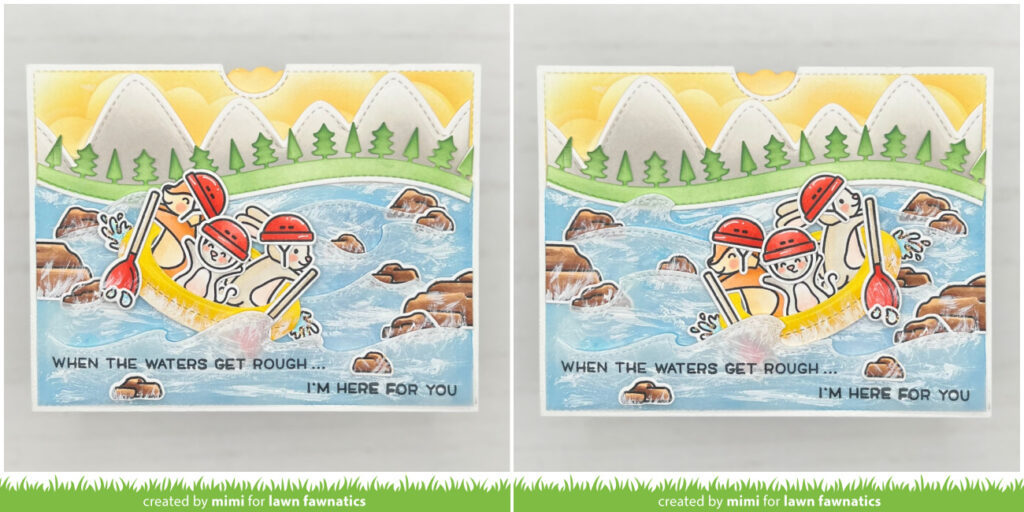
Here are Mimi’s step by step instructions:

I die cut 2 large stitched rectangle panels (top/bottom) and die cut a notch on top of each for the reveal wheel.

I masked all the edges of my top panel. I ink blended with distress oxide inks. The clouds were blended with Wild Honey at the top 1/3 of the panel. The rest, I ink blended with Salty Ocean.

I die cut the stitched mountain border, ink blended with Hickory Smoke and the forest border with Mowed Lawn and Rustic Wilderness.

Using a 5 3/8” x 3” piece of vellum, I die cut 4 stitched wave borders, carefully not cutting pass the ends, leaving about 1/4” in tact. I used white paint and brushed streaks to create water waves.

I stamped, colored and die cut all my images. The raft was made from the Flamingo Floatie, trimming off the head/neck and tail.

I placed the vellum on top of my top panel and die cut the arc-shape window (from the Reveal Wheel die set). I put the vellum piece aside and assembled the the reveal wheel mechanism along with the bottom panel. I also die cut 3 circles from the Flamingo Floatie die, glued them together and placed it on my wheel through the exposed arc-window.

I assembled the card by adhering the vellum piece first, then the mountains and the forest border. I glued the critters in the raft and attached it to the circle die on the reveal wheel. I then glued the paddles and the water drops/splatters to the raft. I randomly placed the rocks in between the wave borders. I used a few foam squares to ‘lift’ the bottom wave border up so the raft can move back and forth smoothly. Lastly, I also added some final touches of water waves on the rock with the white paint.

I stamped the ‘turn’ and the sentiment in Jet Black ink to finish the card, adding some sparkle glaze to the water drops/splatter for some interest.

Turn the wheel and watch the critters raft through some whitewater rapids on the river!

Thank you so much for this amazing inspiration, Mimi! Such a great way to close out the Into the Woods samples!

Supplies:

Featured Fawnatics and Challenge 142 Random Winner

Yay! Your Interactive Card challenge projects are amazing! Thank you so much for joining us for this challenge! Be sure to check out the Challenge 142 gallery for all the fantastic interactive inspiration you could ever want!


If you are one of our Featured Fawnatics today, we invite you to grab this badge to share on your blog or other social sites!

by JoAnn
using Build-a-Barn, Reveal Wheel, Reveal Wheel Build-A-Barn Add-On,
Tiny Farm, Happy Harvest, Hay There

by Jennifer
using Meow You Doin’, Pop-Up Desk, Elphie Selfie

by Eleanor
using Stitched Rainbow, Let’s Toast Pull-Tab Add-On,
Tiny Gift Box Unicorn and Horse Add-On

by Sandy
using A Creature Was Stirring, Magic Picture Changer,
Magic Picture Changer Oven Add-On, Oliver’s Stitched ABCs, Claire’s ABCs

by Debbie
using Peekaboo Pop-Up, Stitched Mountain Borders,
Toucan Do It, Elphie Selfie, Elphie Selfie Flip-Flop,

by Vanessa
using Magic Iris, Magic Iris Add-On, Hay There,
Eggstra Amazing Easter

by Chei
using Flippy Flappy, Joy to All, Screen Time,
Bicycle Built for You, Henry’s ABCs, Window Scene: Winter

by Liz
using Henry’s ABCs, Holographic cardstock,
Rub-A-Dub-Dub, Jessie’s ABCs, Stitched Hillside Pop-Up


And now we have our random drawing winner from Challenge 142 who wins a $50.00 gift certificate to our shop, lawnfawn.com! And the winner is…#84


Congratulations to Kirsten B! Please send an email to fawnies(at)lawnfawn(dot)com with “Lawn Fawnatics random winner” in the subject line. Then grab this random winner badge to display on your blog and social media!


We will share Design Team inspiration during the next 2 weeks for Challenge 143 – Show Us Where You Live. This new challenge runs until Sunday, March 5 at 11:59PM ET. Happy crafting!

Supplies:

Mimi’s Amusement Park Scene with Two Interactive Elements

We invite you to share your creativity by linking up your crafty projects at the end of the challenge post HERE! Your project should feature Lawn Fawn stamps, dies, stencils and papers. This challenge will run for 2 weeks and be open until Sunday, February 19 at 11:59PM ET.

For each challenge, we will randomly select an entry to receive a $50.00 gift certificate to the Lawn Fawn shop! Everyone who enters a challenge has a chance to be the random drawing winner! Woohoo!

We will also be highlighting a few of your fabulous projects at the close of each challenge! By linking your projects to our challenges, you will give permission for us to post your work to this blog and our social media sites. Check out the How to Play page for a few guidelines to play along. We want this to be FUN, so we’ll keep the rules to just a few!

Mimi doubled the fun for her great amusement park scene! She added both the Reveal Wheel and Let’s Toast Pull Tab Add-On interactive element!


Mimi used Coaster Critters for the roller coaster, Ahoy Matey for the palm trees and snow from Winter in the Park as bushes in creating this wonderful scene.


She added characters from Tiny Friends and Tiny Sports Friends! I love how she turned one of them into a balloon-selling clown. To create the swing in the foreground Mimi combined the ship from Ahoy Matey with a piece from the swing set in Let’s Play. That’s what I call getting the most from your stamp sets!


The Reveal Wheel makes the tiny coaster cars loop the loop! Mimi used the hamster wheel from Wheelie Like You to add the loop on the roller coaster!


The Let’s Toast Pull Tab Add-On makes the large coaster cars emerge from the tunnel at the end of the ride! And you’ll never guess what Mimi used for the “tunnel”. Check out Let’s Roll! She turned the sushi roll on its side, so clever!

Thanks so much for sharing this clever and creative inspiration, Mimi!

Supplies:

Be sure to get your Interactive Card Challenge projects linked HERE by Sunday at 11:59PM ET. We will be back on Monday with another great challenge!