A Get Well Before ‘n Afters Card with Jessica!

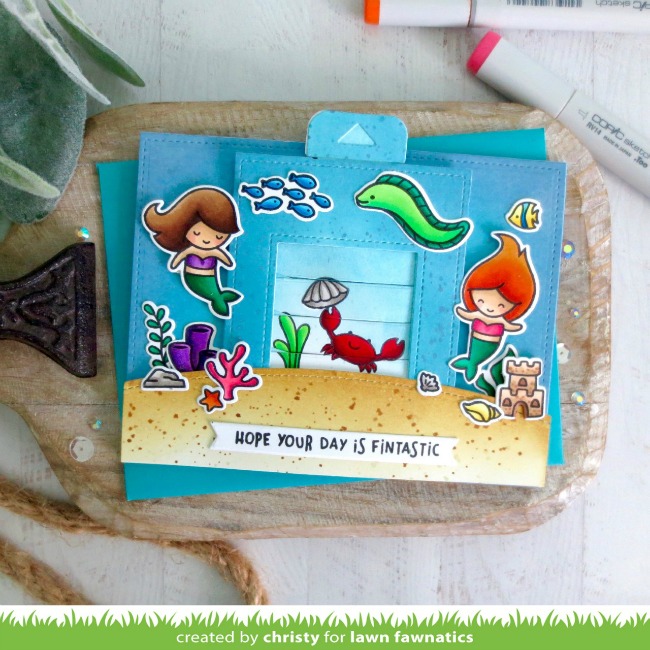
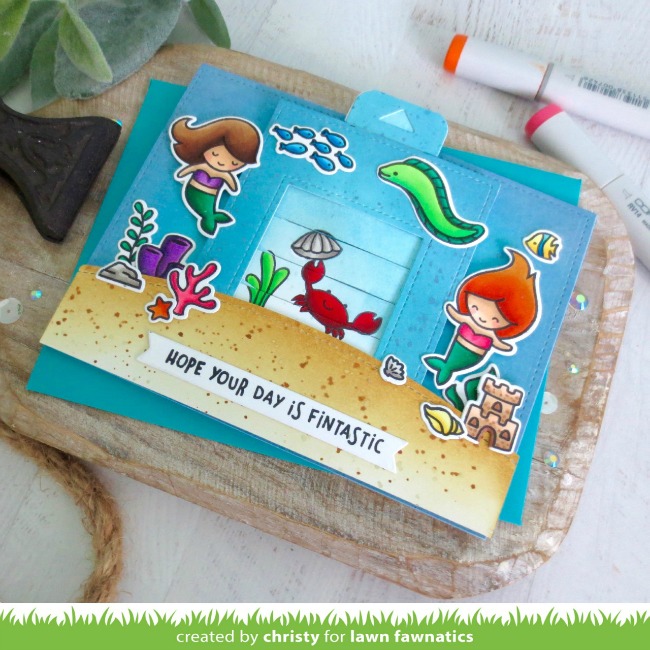
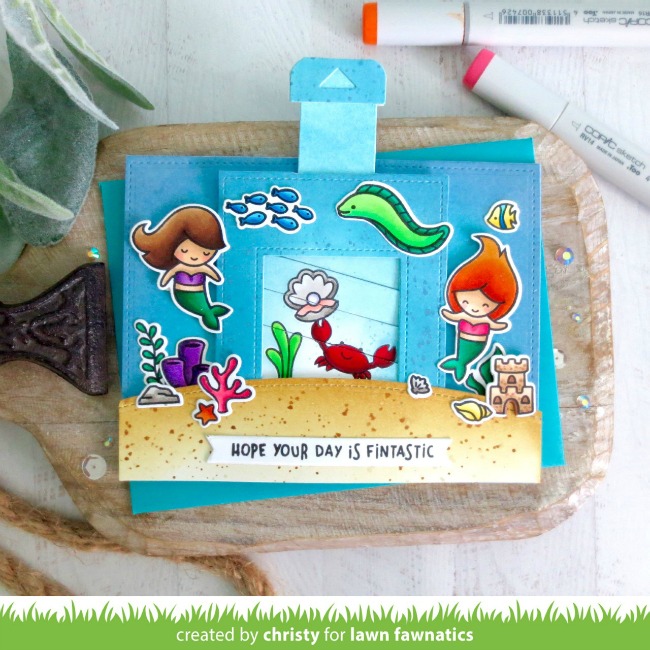
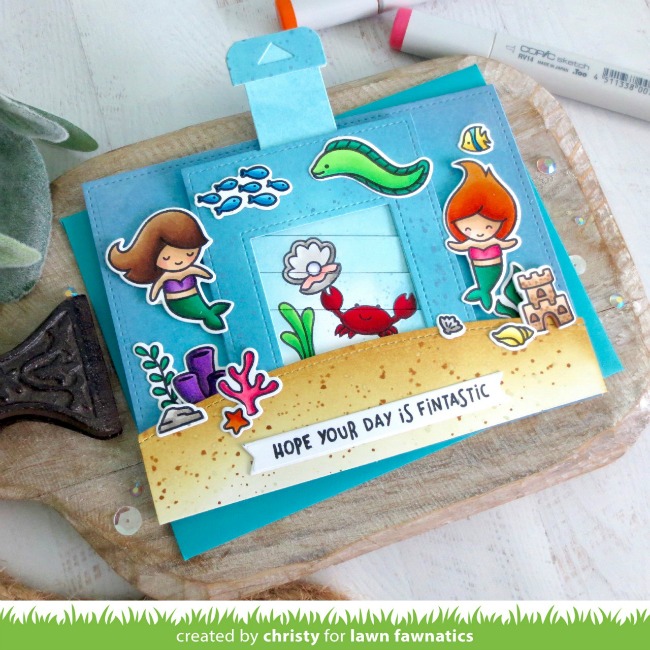
Good morning! Jess here with a card for our current Interactive challenge! I just love interactive cards and couldn’t wait to create this underwater scene with the Magic Picture Changer dies!

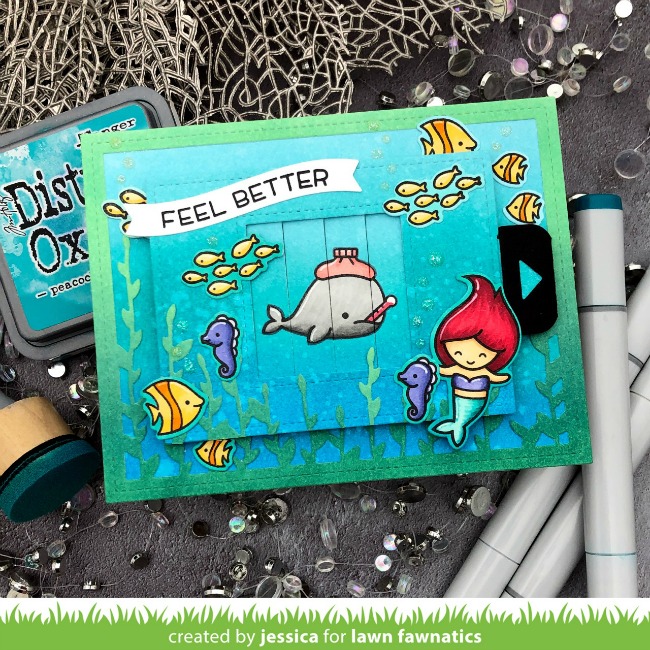
To start I stamped the cute sick and healthy whales from Get Well Before ‘n Afters onto Strathmore Bristol cardstock and colored them with Copic markers. Then I masked them with a Post-it note and blended Tumbled Glass, Mermaid Lagoon and Peacock Feathers Distress Oxide ink onto both backgrounds. Then I die-cut the scenes with the Magic Picture Changer dies and created my Magic Picture Changer scene. I also used the Magic Picture Changer Add-on set to add a black pull tab.

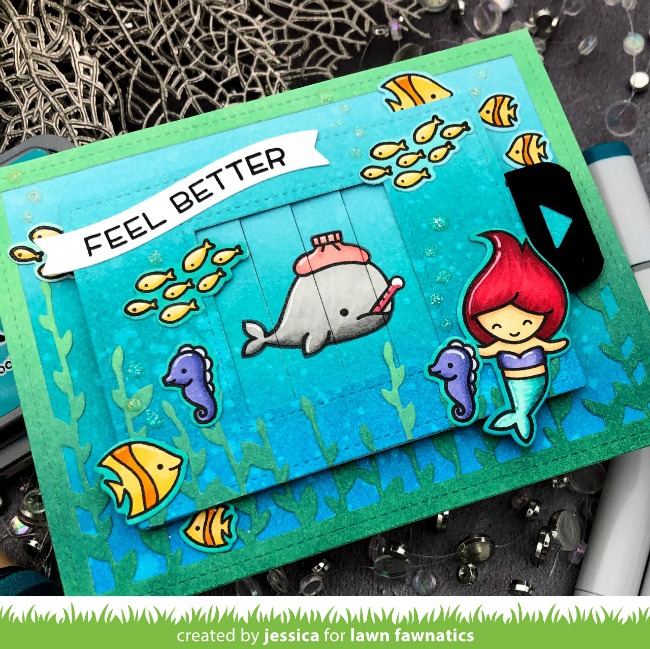
Next I stamped a bunch of images from Fintastic Friends and Mermaid for You and colored them with Copics before die-cutting them with the coordinating dies. I also colored around the die-cuts so they’d match my background.

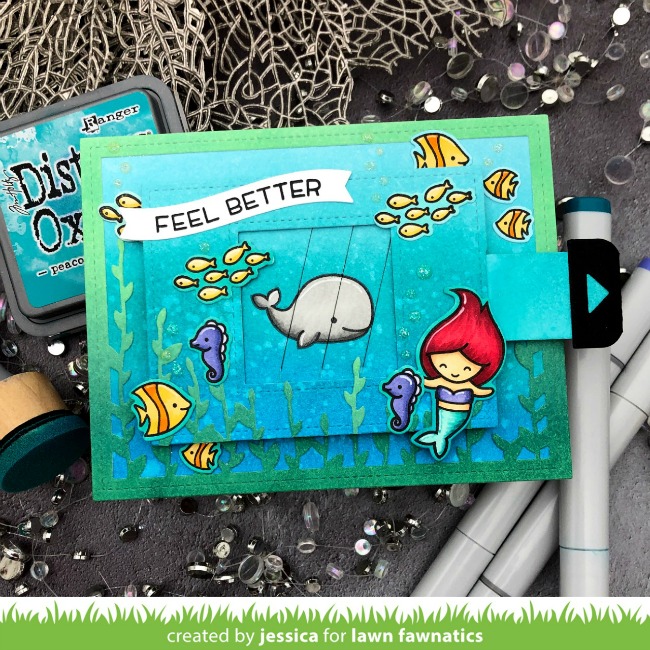
Then I blended the same three Distress Oxide ink colors onto an A2 panel. I also blended Cracked Pistachio, Evergreen Bough, and Pine Needles Distress Oxide ink onto a second A2 panel and die-cut it with the Bayou Backdrop. I die-cut a banner with the Simply Wavy Banners and then stamped the sentiment from Wavy Sayings.

I adhered the Bayou Backdrop onto my blended background and adhered that to a card base. Then I added my Magic Picture Changer scene onto the background panel with foam mounting tape. I added all the extra fish and mermaid around my scene and adhered the banner on top. Finally I added a few accents with a white gel pen and some sparkly bubbles with glitter drops to finish the card!

And that’s it! You have one more weekend to get crafty with our Interactive Challenge and I can’t wait to see what you’ll create! Thanks so much for stopping by and have a fantastic weekend!

Jess

Supplies:

The Interactive Challenge will be open until Sunday, August 18 at 11:59PM ET. We hope you will join us!

A Halloween Shadow Box Card with Franci

Hello there! Franci here with you today with a too cute to spook Halloween Shadow Box Card for our Interactive Challenge!

I love making sweet Halloween projects and for this one I combined the free Party Koala mini stamp set (click HERE for all the details about the Birthday Gift from Lawn Fawn) and the Spooktacular set (an oldie but new to me, I love it!!) First of all I stamped with Jet Black ink, colored with Copic markers and die cut all the images with their coordinated dies.

Then I built my shadow box using the Shadow Box Card die set from my favorite kraft cardstock, it creates a neutral box that you can customize for any occasion!

I glued all my images using foam tape and liquid glue. I also use little stripes of acetate to adhere some of them and achieve the illusion of them floating on my little scene.

I die cut a little rectangle out of white cardstock to create my background and colored it with Distress inks and then added some perfect pearls and white dots here and there to achieve a bright blue sparkly sky look. Aw, these Halloween cuties are adorable!! You could stamp your sentiment on the back if you want to include one or you could add a speech bubble to the scene. One thing I added was.. glitter! I put some glue onto the hills and I spread some Chunky Glitter on top, the effect is amazing!!

Hope you like my card and thank you so much for stopping by! Have a lovely day!
franci

Supplies:

Our Interactive Challenge will be open until Sunday, August 18 at 11:59PM ET. We hope you will join the fun!

Christy’s Under the Sea Magic Picture Changer!

Hey friends, it’s Christy here with a Magic Picture Changer card for our Interactive Challenge! I combined a total of five different stamp sets on this one. Don’t you just love how easy Lawn Fawn sets are to mix and match?

I started by stamping out images from Mermaid for You, Fintastic Friends, and You Are Sublime. I colored them in with Copic markers, trimmed them out with the matching dies, then set them aside.

Then I took one 4 1/4” x 5 1/2” piece of cardstock and one 4 1/4” x 11” piece and traced the openings for the Magic Picture Changer dies with a pencil. Once I knew where to stamp, I stamped the crab from Life is Good, and a sea plant from You Are Sublime on each, then added the closed clam from Keep on Swimming to the crab’s claw on the long panel, and the open clam to the shorter one. I colored them with Copic markers as well, and then created masks for the images with a full-stick Post-it note.

Once they were covered, I took Tumbled Glass Distress Oxide Ink and blended it over top. Then I created two more panels by blending Tumbled Glass in the center, then Broken China, and finally Stormy Sky on the outside edges. I watered a bit of those inks down and flicked drops of them over the panels with a small paint brush. Then I trimmed one of them down with the Magic Picture Changer Add-On, and the other with the Large Stitched Rectangle Stackables. I also created a sand bar with Antique Linen and Brushed Corduroy Distress Ink.

Going back to my crab panels, I used the windows to line up the Magic Picture Changer dies over the images, and ran them through my die-cutting machine. Then I assembled the two together using 1/8” Double-sided Tape on both sides of the flaps. Lawn Fawn has an excellent Magic Picture Changer intro video on their YouTube channel on how to assemble the mechanism, and I will have a video tutorial on this card as well showing the entire process. I used an EK Success Powder Tool to help the mechanism slide smoothly, made sure everything was aligned nice and straight,  and sealed it up. So fun! I love how it looks like the clam is opening to reveal the pearl inside!

Once I assured that it was working properly, I glued the background panel to the card front, then added the Magic Picture Changer on top with foam tape to help the recipient get a good grip on the pull tab. I adhered the panel that was trimmed down with the Magic Picture Changer Add On over top, and used the small square that was left over from the center to die-cut the handle for the pull tab.

I added the sand bar to the bottom of the scene using foam tape on either side of the Magic Picture Changer, then adhered my images all around with a combination of foam tape and liquid glue. To finish it off, I added a sentiment from Keep on Swimming that I trimmed down with an Everyday Sentiment Banner.

I continued the stamping on the inside of the card with a pun and a few images stamped in Forget-Me-Not ink. If you’d like to watch this card come together, you can find it on my YouTube channel, Christy Gets Crafty!
I hope you enjoyed today’s card, and feel inspired to create something for our Interactive Challenge!

Our Interactive Challenge will be open until Sunday, August 18 at 11:59PM ET.

Supplies:

Thanks so much for stopping by today! I hope Christy has inspired you to create something fun!